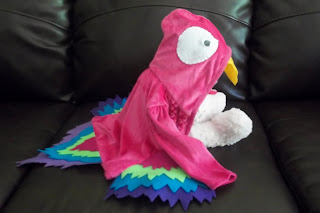
Here's the finished item (on a model since little Miss was sleeping when these were taken)...
Like I mentioned before, my basic supplies were a "track suit," felt, and google eyes. That's all!
Although the pictures don't do it justice, the pink felt is actually the same color as the suit. Since the suit is velor, it seems to glow in my pictures, so be prepared to shield you eyes, ha ha.
I first cut out the wings of the outfit, but I don't have any pictures of that process so I'm going to move on to the tail (very similar to the wings though). First I laid the jacket down with the back towards me. I then took a piece of poster board and laid it across the bottom and drew the tail shape (a triangle). I made the edges sharp just like a bird's tail would look, at least in my opinion, then I cut it out.
I also drew a few more tail shapes on it to represent the shapes for the other colors.
Then I cut out my first layer.
Once my purple was cut, I moved on to the next color. Remember the lines I drew? This is where they come in handy. I just cut down to the next line I drew and traced that shape onto the blue felt. Like this.
Now this is what my two cut out pieces look like when stacked together.
I then repeated the previous step of cutting down to the next line and tracing it onto the next color I was using. And did it again one final time. Here they are stacked.
Once I got here, all I did was glue them together with a glue stick. Although I would not recommend that, it didn't stick very well. But since I knew this outfit would only be worn once or twice, I wasn't too worried about it's durability.
So, to back up and give some instructions for the wings. I did the same steps as you saw for the tail except to get my template I laid the jacket on top of the poster board and traced along the side/arm of the jacket, then joined those lines with a jagged edge (it will almost look opposite of the tail). Everything else is exactly the same. Just do one layer at a time and stack them as you go. Oh, and don't forget you must cut out two of each layer for the wings, since you have to do one for each arm.
Oh I hope I haven't lost you yet...
This is what the three pieces should look like when put together.
The next two steps are the easiest. Take a piece of yellow felt and cut off one of the corners to make the beak. I didn't measure before I cut, I just knew the general size I wanted it to be. Also, cut out two ovals for the eyes. I made mine about 3.5x4 inches. Again, I didn't measure before I cut, I just went with what I thought looked right.
So now this is what you should have: two assembled wings, one assembled tail, two eyes, and one beak, along with the google eyes.
Now comes the fun part of putting it all together. I added everything to the jacket with a blind stitch so it wouldn't be visible, and also so I can easily remove everything for A to wear the plain outfit another time.
I started with the wings. I began my stitches in the armpit area and worked my way toward either the wrist hole or the bottom of the jacket. I did each side of the wing separate (armpit to end) so I could make sure that it was positioned correctly as I went. Of course I repeated this step twice (two wings). You can see the starting knots I tied in the armpit as I started each side from there. Also, a reminder to make sure your detail cuts are to the back of the jacket!
Then it was time to move on to the tail. I just centered it on the bottom seam of the jacket and stitched it there. This is how it should look now.
To add the beak, I just centered it on the front of the hood and again did a blind stitch all the way across.
For the eyes, I figured out where I wanted them on the hood and did a quick center stitch to keep them in place as I top stitched around them.
Are you getting excited? It's almost complete! All that's left is to add the google eye to the eye you sewed on. I chose to put mine more toward front of the hood.
And again here's the finished costume.
If you have any questions, or if you need any more explanation of any of the steps, please feel free to ask in the comments.


GOOD IDEA. THANK FOR SHERING
ReplyDelete